In this guide I will show you how to bundle your Sapper app with Discord OAuth that’s handled on the server side of your web application.
You should be familiar with the basic concepts of Sapper and Discord to get most out of this guide. If you are looking for a quick start template, you can use my sapper-discord-supabase-tailwind starter that has similar project structure than this guide offers.
Looking for a SvelteKit alternative? Check out my SvelteKit version of this guide here.
Creating a new Sapper project
To get started, we will need to create a new Sapper project with Rollup as the bundling tool:
npx degit "sveltejs/sapper-template#rollup" my-appAnd install dependencies with npm install
We will need few additional node packages to achieve what we want to do. First of all, we want to replace Polka with Express. We can achieve this by running these commands:
npm uninstall polka && npm install expressNow let’s configure our server.js file by replacing polka() with express().
Alright. Now, let’s configure our Discord properties!
Creating a Discord application
First, we want to create a new file under src folder of our Sapper project. We call this file discord.js
Now let’s get the Client ID and Secret Token we are missing. Let’s head to Discord Developers Portal > Applications and create a new application.

What we need to grab is Client ID and Secret Token:

Now, we must also add OAuth2 Redirect URI by heading to applications OAuth2 tab:

And fill those in the Discord.js file.
Creating a Discord Authentication API
Alright, now let’s start building our authentication API. Let’s add new folder called api under our src/routes folder. Within the api folder, we want to create auth.js route, callback.js route, refresh.js route and signout.js route.

routes/api/auth
Let’s start building those files from top to bottom, so starting from auth.js as it’s the simplest one to do. We want to import our Discord Endpoint to the route and redirect user to that when they visit the route (i.e. localhost:3000/api/auth URL)
Now what happens is that when user goes to localhost:3000/api/auth, they will be redirected to Discord’s authentication service. Here is example how that will look like:

routes/api/callback
Alright. Now we need to build the callback.js route. This is where our user will be redirected after authentication.
Let’s install a dependency we need: npm install node-fetch. This will allow us to use fetch within server routes.
We should also install some middlewares for our Express (i.e. server.js), so we can store user session in cookies. We can install these with npm install body-parser && npm install cookie-parser. Let’s setup these a bit later.
Now back to the callback route. When user finished authenticating on Discord’s end, they are redirected to http://localhost:3000/api/callback.
The URL will have their access code, i.e. http://localhost:3000/api/callback?code=123456790123123
We want to access this code, and then use it to fetch the actual access token for the user. Access token allows our application to perform certain actions for the authenticated user.
If fetching access token fails, we want the user to be redirected to front page. If it’s successful, users access and refresh token should be placed in cookies, and user redirected to a dashboard page.
Here is the code breakdown:
routes/api/refresh
This route will handle refreshing the access token of user. This whole refresh process is greatly explained in a video by Ben Awad. You can see it below, or skip it depending on your preference. Understanding the process is not required, but valuable.
Shortly put, each time our user connects to the application, we will get valid access token from Discord by using the refresh token. Then we will store the new tokens in cookies, or clear the cookies if fetching new token failed. Our access token will expire in 10 minutes from cookies, and refresh token in 30 days. Here is the code breakdown. It’s quite similar to callback one, but with slight difference especially in Discord endpoint:
routes/api/signout
Let’s add a sign out feature so user can clear their session, which is achieved by just clearing the cookies:
Reading user tokens on each session
We obviously want to access the authenticated user from our application. To achieve this, we will need to know if they are authenticated and get their token to perform actions with. We will need to modify server.js and _layout.svelte files to achieve this.
Modifying the server.js
Let’s add the cookie-parser and body-parser packages we installed earlier, and then on each session check if there is a JWT stored in user’s cookies. If there is one, and it’s valid, we save the token and Discord user object to session data so we can access it within our Svelte files.
Modifying _layout.svelte
Now that on each session we verify the token and set the token and Discord user object to session data, we can access this in our Svelte files.
Creating user dashboard
Now let’s build the user dashboard where user is redirected upon authentication. Let’s create dashboard.svelte under routes folder.
During preloading the page, we want to redirect the user to authentication flow if they do not have valid token set in the session. If they have, we allow loading of dashboard.
We also have a button to perform a sign out request to our /api/signout route.
We can now access the user via discordUser object as seen in the code breakdown below:
Now let’s add link to dashboard in our Nav.svelte:
<a aria-current=”{segment === ‘dashboard’ ? ‘page’ : undefined}” href=”/dashboard”>dashboard</a>
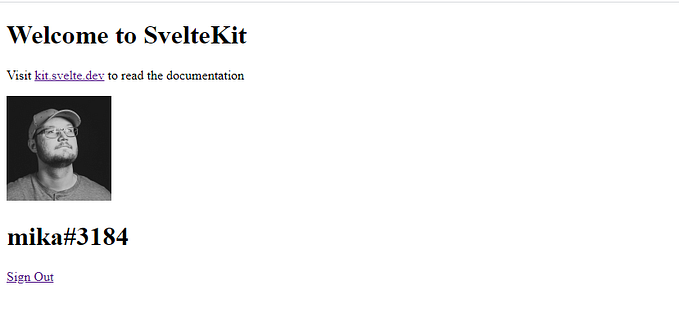
And this is what we should now have:

Let’s recap what we now have:
- Each time user goes to /dashboard or /api/auth, they are taken to Discord for authentication
- After authenticating, they are taken via /api/callback to either /dashboard or front page, depending if authentication was successful or not
- User access token is saved in cookies for 10 minutes and refresh token is for 30 days. If access token expires, we use refresh token to fetch new access token.
- User token and Discord user object can be accessed via session object during preload of a page (variables userToken and discordUser)
- User can clear their session by going to /api/signout or clicking the sign out button on dashboard.
That’s it. Now we have a simple Discord portal built with Sapper and ready to be developed on.
Consider checking out my sapper-discord-supabase-tailwind starter template to quickly develop Discord portals with TailwindCSS and Supabase.io, the open-source Firebase alternative.


